Navigating the Hazmat Maze: What to Do When You Encounter the Dangerous Placard
When you see a “Dangerous” placard on a transport vehicle, it’s a clear signal: things just got complicated. While placards like Class 1 (explosives) or Class 3 (flammable liquids) are straightforward, the “Dangerous” placard represents a mishmash of hazards that could go any direction. It’s one of those moments that gives hazmat responders a few extra hairs on the back of their necks. The uncertainty is part of the challenge, and how we respond can mean the difference between a well-managed situation and an emergency spiraling out of control.
In this post, we’re going to take a deep dive into what that “Dangerous” placard actually means, how to respond, and why it’s one of the most misunderstood- but crucial- pieces of hazmat safety.
What Exactly Is the “Dangerous” Placard?
The “Dangerous” placard isn’t part of the traditional nine hazardous materials classes. Instead, it’s used when a transport vehicle or container holds multiple types of hazardous materials that each would require its own placard but doesn’t have space for them all. The resulting red-and-white diamond with the word Dangerous on it is a warning sign that says: Heads up, this is complicated and we don’t know exactly what’s in there.
The problem? It doesn’t tell responders much beyond the fact that multiple hazards exist. While it serves as a warning, it’s also a bit vague. That’s why when you see this placard, you’ve got to assume the worst until you gather more details.
What Should Hazmat Teams Expect?
Here’s the thing: expect the unexpected. Responding to a “Dangerous” placard can be like walking into an unpredictable chemical lab. You’ve got multiple hazard classes mixed together- flammable, corrosive, toxic, and possibly reactive materials- all in one load. This means that in a worst-case scenario, everything could go wrong simultaneously.
Hazmat teams need to be on high alert for things like:
- Chemical reactions: Different materials may react when mixed, and that could trigger fires, toxic fumes, or other dangerous outcomes.
- Pressure buildup: Some chemicals, especially gases or flammable liquids, can build up pressure, leading to ruptures or explosions.
- Biological hazards: While not as common, you could have infectious or biohazardous materials mixed in, which adds another layer of danger.
- Environmental impact: Certain chemicals may not only harm people but also create massive environmental hazards if spilled.
Approaching the Scene
Safety first: always approach the situation from a distance and gather as much info as possible before getting close. Use binoculars, remote cameras, or drones if available. In hazmat situations, the more you can see from afar, the better. Contact the shipping company or the truck driver for additional info. Any knowledge is useful.
When you do approach, it’s crucial to follow basic safety protocols:
- Upwind, uphill, upstream: These are the key directions to approach from, minimizing exposure to potential hazards.
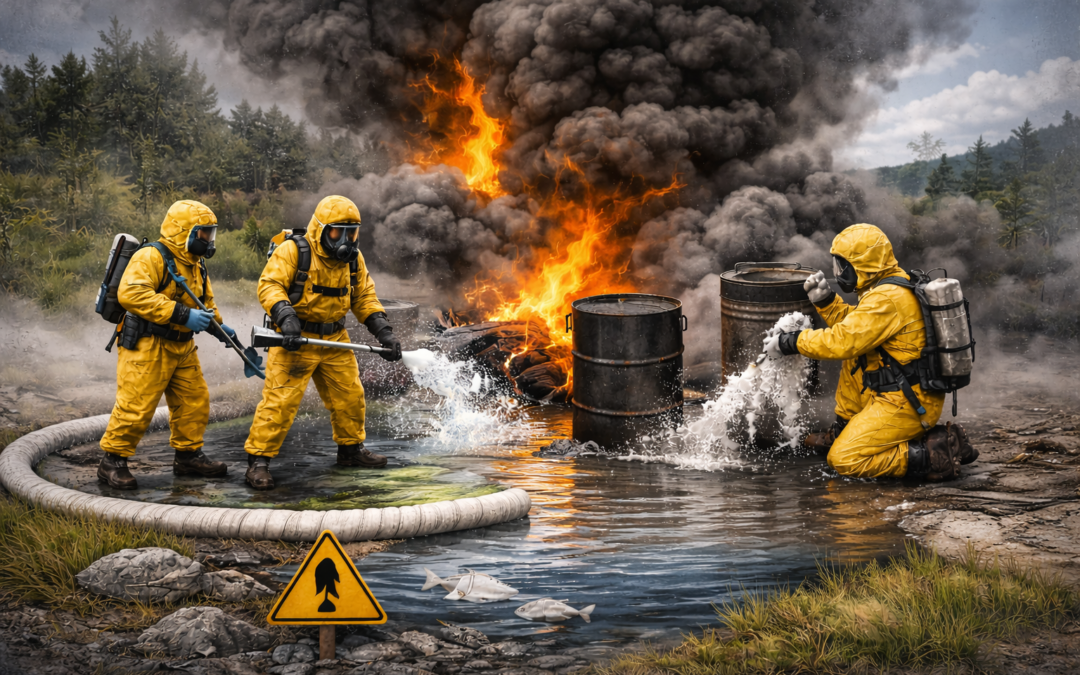
- PPE: Start with bunker gear, especially when flammable materials are involved. Also, don’t forget your meters for detecting gases, toxic vapors, or other chemicals in the air.
Handling Spills, Fires, and Unknowns
If the situation escalates into a spill or fire, the response plan needs to be tailored to the unknowns you’re dealing with. The first priority is always containment and minimizing the damage.
- Isolate the area: Stay a safe distance away- this isn’t the time for close-range heroics.
- Fire suppression: This is tricky because mixing hazardous chemicals might mean certain materials could get worse if water is used. Consider defensive tactics, like cooling exposures, rather than directly suppressing the fire with water.
- Secondary containment: Always be prepared to control runoff from the spill, even though it may be impossible to predict the exact consequences. Creating barriers and using absorbents is key.
Decontamination Protocols
Decontamination in a “Dangerous” placard scenario requires extra care. You’re likely dealing with mixed chemicals, and the wrong reaction can make things worse.
- Personal Decon: Ensure that all responders have proper decon procedures in place. This means removing contaminated gear, washing thoroughly, and ensuring all equipment is cleaned before being reused.
- Victim Decon: If there are victims involved, get them to safety first, then perform decontamination in a controlled manner. For responders, be cautious with what chemicals could cross-contaminate your gear or the decon site.
Post-Incident Review and Continuous Improvement
Once the situation is stabilized, it’s time for a post-incident review. Analyzing how well your team did in handling the “Dangerous” placard scenario will help strengthen future responses.
Ask yourself:
- Did the hazard prediction match the observed behavior?
- Was zone control effective considering the multi-class nature of the hazards?
- Were PPE and monitoring tools adequate?
- What could have been done differently to improve response times or safety?
These evaluations can turn every incident into a learning experience.
Conclusion: Be Ready for Anything
The “Dangerous” placard is one of the most challenging hazards for hazmat teams to deal with. It’s unpredictable, messy, and dangerous- but with proper training, preparation, and a cautious approach, responders can safely handle even the most complex hazmat situations. So, next time you spot that red-and-white diamond, don’t take it lightly. Get the information, use your resources, and stay prepared to handle whatever’s inside.
After all, hazmat response isn’t just about dealing with what’s in front of you- it’s about staying one step ahead, anticipating the worst, and being ready for whatever comes next.
Call to Action:
Want to know more about hazmat response strategies? Stay informed, stay safe, and check out our other posts for more tips on handling hazardous materials.